

[](https://github.com/Dr-Noob/cpufetch/stargazers)
[](https://github.com/Dr-Noob/cpufetch/issues)
[](https://repology.org/project/cpufetch/versions)
[](https://github.com/Dr-Noob/cpufetch/blob/master/LICENSE)
Simple yet fancy CPU architecture fetching tool
# Table of contents
- [1. Support](#1-support)
- [2. Installation](#2-installation)
- [2.1 Installing from a package](#21-installing-from-a-package)
- [2.2 Building from source (Linux/Windows/macOS)](#22-building-from-source-linuxwindowsmacos)
- [2.3 Android](#23-android)
- [3. Examples](#3-examples)
- [3.1 x86_64 CPUs](#31-x86_64-cpus)
- [3.2 ARM CPUs](#32-arm-cpus)
- [4. Colors and style](#4-colors-and-style)
- [5. Implementation](#5-implementation)
- [6. Bugs or improvements](#6-bugs-or-improvements)
- [7. Acknowledgements](#7-acknowledgements)
# 1. Support
cpufetch supports the following architectures:
- x86 / x86_64
- ARM
- PowerPC
| OS | x86_64 / x86 | ARM | PowerPC | Notes |
|:---------:|:-------------------------:|:-------------------:|:-----------------:|:-----------------:|
| GNU/Linux | :heavy_check_mark: | :heavy_check_mark: | :heavy_check_mark: | Best support |
| Windows | :heavy_check_mark: | :x: | :x: | Some information may be missing.
Colors will be used if supported |
| Android | :heavy_exclamation_mark: | :heavy_check_mark: | :x: | Some information may be missing.
Not tested under x86_64 |
| macOS | :heavy_check_mark: | :heavy_check_mark: | :x: | Only the Apple M1 is supported in ARM |
| FreeBSD | :heavy_check_mark: | :x: | :x: | Some information may be missing. |
# 2. Installation
## 2.1 Installing from a package
Choose the right package for your operating system:
[](https://repology.org/project/cpufetch/versions)
If there is no available package for your OS, you can download the cpufetch binary from [the releases page](https://github.com/Dr-Noob/cpufetch/releases), or [build cpufetch from source](#22-building-from-source-linuxwindowsmacos) (see below).
## 2.2 Building from source (Linux/Windows/macOS)
You will need a C compiler (e.g, `gcc`), and `make` to compile `cpufetch`. To do so, just clone the repo and run `make`:
```
git clone https://github.com/Dr-Noob/cpufetch
cd cpufetch
make
./cpufetch
```
The Makefile is designed to work on Linux, Windows and macOS.
## 2.3 Android
1. Install `termux` app (terminal emulator)
2. Run `pkg install -y git make clang` inside termux.
3. Build from source normally:
- git clone https://github.com/Dr-Noob/cpufetch
- cd cpufetch
- make
- ./cpufetch
# 3. Examples
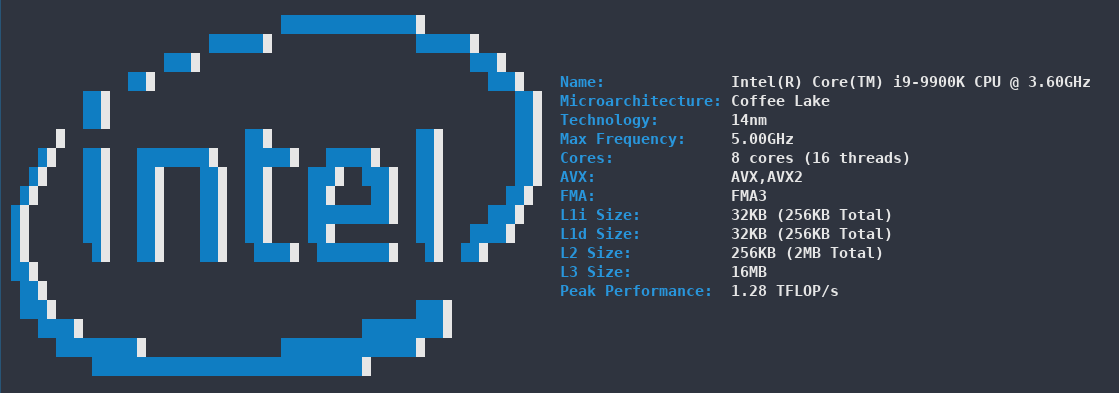
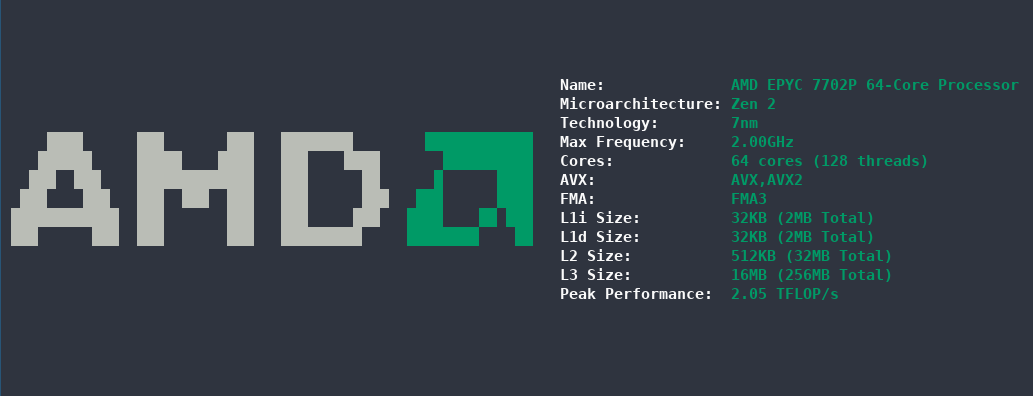
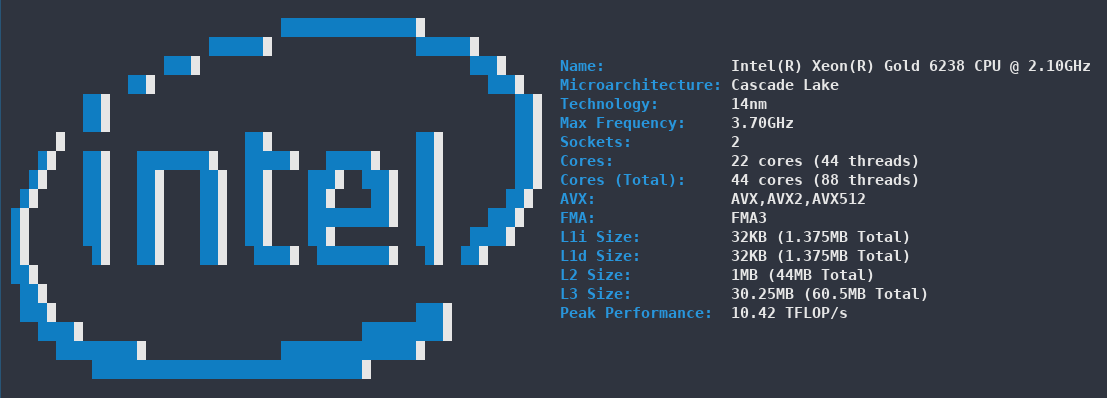
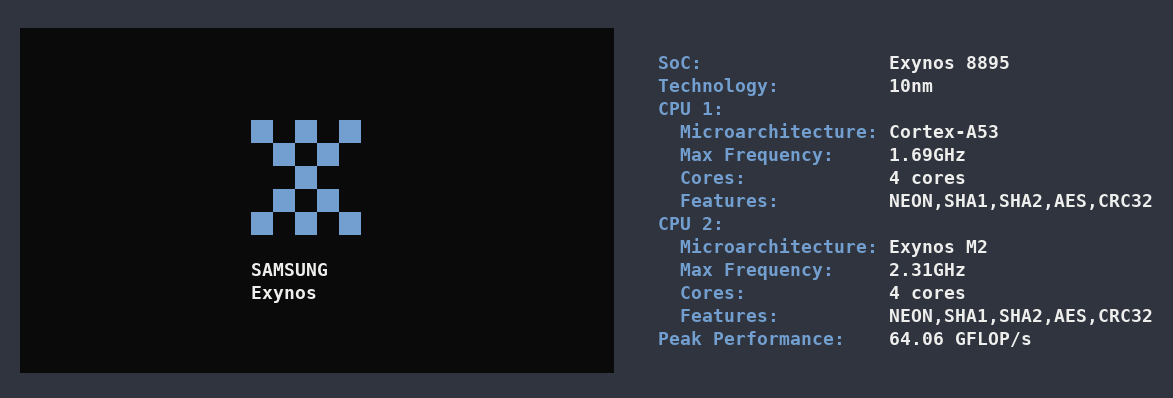
Here are more examples of how `cpufetch` looks on different CPUs.
## 3.1 x86_64 CPUs
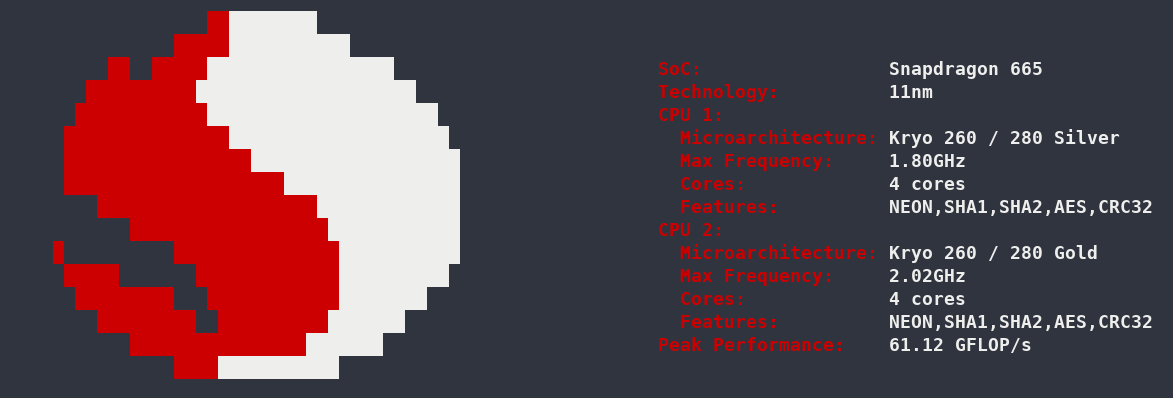
## 3.2 ARM CPUs
# 4. Colors and style
By default, `cpufetch` will print the CPU art with the system colorscheme. However, you can always set a custom color scheme, either
specifying Intel or AMD, or specifying the colors in RGB format:
```
./cpufetch --color intel (default color for Intel)
./cpufetch --color amd (default color for AMD)
./cpufetch --color 239,90,45:210,200,200:100,200,45:0,200,200 (example)
```
In the case of setting the colors using RGB, 4 colors must be given in with the format: ``[R,G,B:R,G,B:R,G,B:R,G,B]``. These colors correspond to CPU art color (2 colors) and for the text colors (following 2). Thus, you can customize all the colors.
# 5. Implementation
See [cpufetch programming documentation](https://github.com/Dr-Noob/cpufetch/doc/README.md).
# 6. Bugs or improvements
See [cpufetch contributing guidelines](https://github.com/Dr-Noob/cpufetch/CONTRIBUTING.md)
# 7. Acknowledgements
Thanks to the fellow contributors and interested people in the project. Special thanks to:
- [Gonzalocl](https://github.com/Gonzalocl), [OdnetninI](https://github.com/OdnetninI): Tested cpufetch in the earlier versions of the project in many different CPUs.
- [Kyngo](https://github.com/Kyngo): Tested cpufetch in the Apple M1 CPU.
- [avollmerhaus](https://github.com/avollmerhaus): Gave me ssh acess to a PowerPC machine, allowing me to develop the PowerPC port.
- [bbonev](https://github.com/bbonev), [stephan-cr](https://github.com/stephan-cr): Reviewed the source code.